

A diagnostic monitor is only as reliable as its last calibration. Without strict adherence to DICOM Part 14 GSDF, even a high-end 12MP display can fail to reveal critical pathology hidden in the subtle grayscale variances of a medical image. You likely understand that maintaining image consistency across a growing network of remote and hospital-based workstations is a constant logistical challenge. The fear that a home reading environment doesn't match the precision of the hospital’s diagnostic bay is a valid concern for any modern radiology department.
This radiology monitor calibration guide provides a clear path to mastering DICOM compliance in 2026. We've designed this resource to help you eliminate the complexity of managing disparate sites while ensuring your hardware meets the latest ACR standards for luminance and contrast. You'll gain a repeatable quality assurance process that guarantees diagnostic confidence regardless of the reader's location. We'll explore the technical requirements for DICOM 2026c, the shift toward automated remote calibration, and how to bridge the gap between hardware capability and clinical reliability.
Key Takeaways
- Understand how DICOM Part 14 GSDF aligns display performance with human visual perception to ensure every grayscale level is perceptually linear.
- Use this radiology monitor calibration guide to establish a repeatable QA process that eliminates diagnostic errors caused by degraded image quality.
- Learn how to manage ambient light levels and hardware warm-up times to meet strict ACR requirements for luminance and contrast ratios.
- Maintain hospital-grade accuracy at remote workstations by addressing the specific environmental and technical challenges of teleradiology environments.
- Modernize your workflow by integrating automated Jusha calibration sensors and centralized PACS Harmony reporting for simplified enterprise-wide compliance.
The Fundamentals of DICOM Part 14 and GSDF Compliance
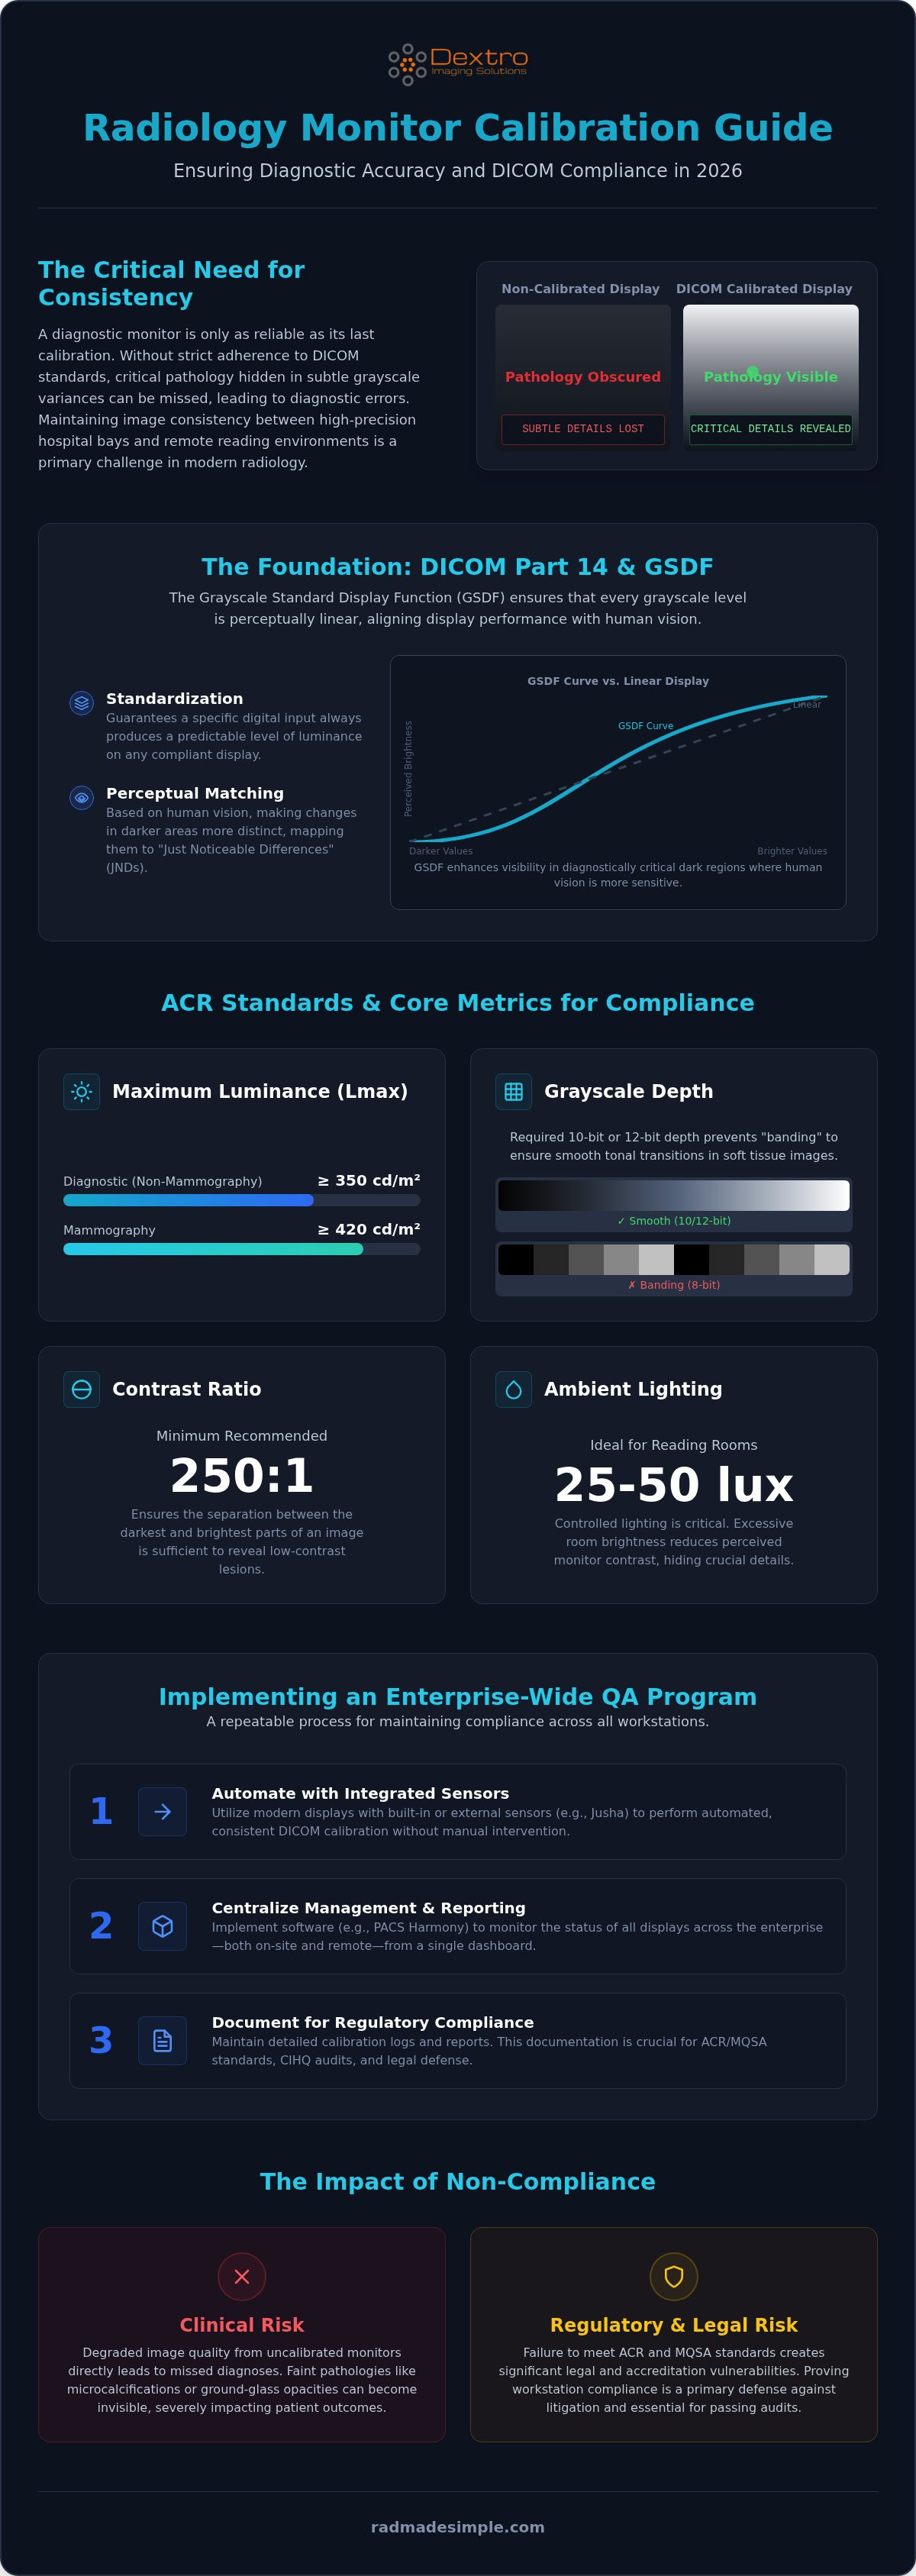
Clinical diagnostic accuracy is impossible without a standardized way to represent grayscale values. The DICOM standard, specifically Part 14, defines how medical images should appear on any compliant screen. This standard is built on the Grayscale Standard Display Function (GSDF). It ensures that a specific digital input always results in a predictable level of luminance. This consistency is what allows a radiologist to trust that the image they see in a home office is identical to what appears on a hospital workstation. Without this mathematical alignment, the same X-ray could look significantly different on two separate monitors, leading to potential discrepancies in interpretation.
Understanding the Grayscale Standard Display Function (GSDF)
GSDF is the clinical benchmark for medical imaging consistency. It uses a mathematical model based on human vision. Our eyes don't perceive changes in light linearly; we're more sensitive to changes in darker areas than in bright ones. GSDF maps these changes to "Just Noticeable Differences" (JNDs). By using internal Look Up Tables (LUT), high-performance displays like Jusha Diagnostic Monitors can adjust their output to match this perceptual curve. This process transforms raw digital data into a clinically meaningful visual representation. It removes the guesswork from image display by ensuring that each step in the grayscale is equally visible to the human eye.
Luminance and Contrast: The Core Metrics
In 2026, meeting the Grayscale Standard Display Function requires more than just a bright screen. For non-mammography diagnostic interpretation, the ACR recommends a minimum maximum luminance (Lmax) of 350 cd/m2. Mammography requires even higher performance, targeting 420 cd/m2. While many consumer screens boast high contrast ratios, they often lack the 10-bit or 12-bit grayscale depth necessary to prevent "contouring" or "banding" in soft tissue images. A true radiology monitor calibration guide focuses on these specific metrics to ensure no subtle pathology is lost in a crushed black level or an overblown highlight. A contrast ratio of at least 250:1 is the baseline, but the distribution of those tones across the GSDF curve is what truly matters for clinical safety.
Ambient lighting plays a critical role in how we perceive these metrics. If a room is too bright, the perceived contrast of the monitor drops, effectively hiding low-contrast lesions. The current standard for reading rooms is between 25 and 50 lux. Relying on "factory calibrated" settings is a common mistake. Hardware drifts over time as backlights age. Using an enterprise solution like PACS Harmony allows for centralized monitoring of these fluctuations. It ensures that every display in your network remains clinically compliant rather than just technically functional. Regular validation is the only way to maintain the integrity of the diagnostic chain.
Why Calibration is Clinically Critical for Diagnostic Accuracy
Calibration isn't merely a technical box to check; it is a clinical necessity that directly impacts patient outcomes. When a display fails to meet DICOM standards, it loses the ability to render the subtle grayscale transitions essential for identifying early-stage pathology. Tiny microcalcifications in mammography or faint ground-glass opacities in lung CTs can easily vanish if a screen's luminance is poorly mapped. This radiology monitor calibration guide emphasizes that diagnostic accuracy depends on the monitor's ability to maintain a consistent "Just Noticeable Difference" across the entire grayscale spectrum.
Regulatory bodies like the American College of Radiology (ACR) and the Mammography Quality Standards Act (MQSA) enforce strict display requirements for a reason. Non-compliant hardware doesn't just risk a missed diagnosis; it creates significant legal and accreditation risks for the facility. If an interpretation is challenged in court, proving that the reading station met all current ACR standards for luminance and contrast is a primary line of defense. Facilities that fail to document regular calibration often face difficulties during CIHQ audits or when defending their clinical decisions. Ensuring your diagnostic displays are compliant protects both the patient and the provider from the consequences of substandard imaging.
Pathology Detection and Subtle Contrast
Modern LCD and OLED panels are susceptible to "drift," a gradual degradation of backlight intensity and color accuracy over time. As a monitor ages, its maximum luminance drops, and its black levels may rise, effectively "crushing" the contrast in darker regions of an image. This drift is often invisible to the naked eye until it reaches a critical point where clinical detail is compromised. Using a 2026 Radiology Equipment Compliance Checklist helps departments stay ahead of these hardware shifts. Regular validation ensures that the subtle contrast required to distinguish a small nodule from surrounding tissue remains intact throughout the display's lifecycle.
Consistency Across Multi-Modality Workflows
Radiologists today rarely look at a single modality. A single workstation must accurately display high-resolution X-rays alongside multi-slice CT and MRI scans, each with unique requirements for bit depth and brightness. Jusha Diagnostic Monitors are engineered to handle these multi-modality demands, providing the stability needed for complex clinical reviews. When images are clear and consistent, secondary tools like RadVoice reporting software become even more effective. A radiologist who isn't struggling to squint at a degraded screen can dictate findings more quickly and accurately. This efficiency streamlines the entire diagnostic loop, ensuring that clear visualization leads to a precise and timely final report.
Step-by-Step Guide to Radiology Monitor Calibration
Transitioning from theoretical compliance to practical execution requires a methodical approach. This radiology monitor calibration guide outlines the five essential steps to ensure your displays meet 2026 diagnostic standards. Following a repeatable protocol doesn't just satisfy regulatory audits; it provides the clinical certainty that every pixel is rendered with precision. It's a proactive way to manage hardware life cycles and maintain interpretation quality.
The process begins with environmental control. Ambient light should be maintained between 25 and 50 lux to prevent glare from washing out subtle grayscale details. Next, hardware preparation is critical. You must clean the screen with a non-abrasive medical-grade wipe and allow the backlight to warm up for at least 30 minutes. This stabilization period ensures that the luminance levels are consistent before any measurements are taken. Cold backlights often produce erratic readings that lead to false failures.
Sensor placement and software execution follow. While external photometers are traditional, modern workflows favor integrated front sensors found on Jusha Diagnostic Monitors. These sensors provide continuous, non-intrusive monitoring without requiring user intervention. Once the sensor is active, the calibration software runs the GSDF conformance test, mapping the display's output against the standard curve. The final step is documentation. You must generate a detailed compliance report that archives the "Pass/Fail" status and specific luminance values for future review.
Tools Required for Professional Calibration
High-volume sites benefit significantly from monitors with integrated front sensors. These tools eliminate the need for manual intervention and ensure that every station in a PACS workstation setup remains within tolerance. A high-precision photometer is necessary to measure minimum and maximum luminance (Lmin and Lmax) accurately. Without professional-grade software to manage these tools, maintaining enterprise-wide compliance becomes a fragmented and error-prone task.
Executing the Conformance Test
The conformance test evaluates how closely the monitor matches the DICOM GSDF curve. In 2026, the standard allows for a maximum 10% deviation in Just Noticeable Differences (JNDs). If a monitor fails, the software adjusts the internal Look Up Table (LUT) to bring the performance back into range. To save the calibration certificate for ACR audits, follow these steps:
- Complete the full conformance test via your QA software.
- Review the digital report for any "out of tolerance" flags.
- Select the 'Export as PDF' or 'Archive to Database' option.
- Ensure the file name includes the workstation ID and the current date for easy retrieval.
Consistency is the goal. Automated systems like PACS Harmony can centralize these reports, making audit preparation a seamless part of your daily operations. This structured approach removes the guesswork from quality assurance and allows your team to focus on clinical delivery.
Remote Reading Challenges: Calibrating Teleradiology Workstations
Teleradiology has decentralized the reading room, but it hasn't lowered the bar for clinical standards. A home office often lacks the controlled conditions of a hospital, yet the diagnostic stakes remain identical. This radiology monitor calibration guide addresses the critical need for parity between remote and on-site environments. Without standardized hardware, radiologists risk missing subtle findings due to poor ambient light control or hardware drift. Consistency is the only way to ensure that a diagnosis made at home is as reliable as one made in the hospital.
Many remote readers consider using high-end consumer displays, but these lack the 10-bit grayscale depth and DICOM-compliant backlights required for medical interpretation. Teleradiologists must utilize the same diagnostic radiology monitors as their hospital-based colleagues. This ensures that the contrast levels seen in a residential setting match the clinical intent of the imaging modality. Relying on unvalidated hardware introduces unnecessary risk into the diagnostic chain and can lead to discrepancies between different reading environments.
Managing the Home Reading Environment
Home offices are prone to unpredictable lighting from windows and domestic fixtures. To maintain the ACR-recommended 25 to 50 lux, monitors should be positioned perpendicular to light sources to reduce glare. For those on the move, the Radcom Compact provides a streamlined solution that ensures connectivity and compliance without the bulk of a permanent station. Implementing a traveling radiologist workstation setup allows for mobile diagnostic accuracy. These portable radiology workstations maintain the same DICOM Part 14 standards as a fixed desk, providing flexibility without compromising image quality.
Centralized Management of Remote Displays
Managing a fleet of remote monitors is a significant burden for IT departments. Centralized QA tools allow teams to monitor calibration status from a distance, removing the responsibility from the individual radiologist. Systems like aycan PACS and PACS Harmony facilitate this by providing a unified view of every display's performance across the enterprise. Automated alerts can flag a monitor that has drifted out of tolerance before it leads to clinical downtime. This proactive approach ensures that every teleradiologist in the network is reading on a validated, compliant screen. If you need to upgrade your remote fleet, explore our portable radiology workstations for a fully integrated, compliant solution.
Implementing an Enterprise-Wide Quality Assurance Program
Establishing an enterprise-wide QA program means moving past the era of reactive troubleshooting. In a high-volume clinical environment, you can't afford to wait for a radiologist to notice a display issue. Modern systems shift the burden from human observation to automated verification. By integrating your calibration data with PACS Harmony, you create a unified workflow where compliance reports are generated in the background. This proactive approach ensures that every station, whether in the hospital or a remote office, remains within DICOM tolerance without manual intervention. It's the final step in a truly professional radiology monitor calibration guide strategy.
The ROI of high-end diagnostic monitors extends beyond simple compliance. When a display is perfectly calibrated to GSDF standards, it reduces the cognitive load on the radiologist. This leads to reduced eye strain and faster turnaround times for critical reports. Choosing Dextro as your partner ensures you have the hardware and software synergy required to maintain these high-performance radiology setups across your entire network. We simplify the complex task of managing multiple sites, providing the technical authority you need to interpret with absolute confidence.
Automation and Remote Monitoring Tools
Jusha Diagnostic Monitors lead the industry shift toward automation with built-in front sensors that perform "silent" calibrations. These integrated tools eliminate the manual QA windows that once burdened IT staff. When your visual output is consistently accurate, other productivity tools like voice recognition for radiologists become far more effective. Clearer images allow the radiologist to dictate findings more decisively, while RadVoice captures those insights with greater speed. This integration reduces the total time spent per study and minimizes the administrative weight on your technical team through scheduled, automated QA tasks.
The Future of Radiology Display Compliance
Looking ahead, the emergence of OLED diagnostic displays introduces new calibration needs regarding sub-pixel aging and peak luminance stability. Dextro Reading Stations are evolving to meet these 2026 interpretation speeds, providing the processing power and display stability required for modern imaging modalities. Maintaining enterprise-wide accuracy shouldn't be a source of stress for your clinical teams. Contact Dextro Imaging Solutions for a compliance consultation to modernize your diagnostic fleet and ensure your department stays ahead of the latest regulatory standards.
Future-Proof Your Diagnostic Workflow with Automated Compliance
Maintaining diagnostic accuracy in 2026 requires more than high-performance hardware; it demands a commitment to continuous, automated validation. This radiology monitor calibration guide has provided the framework for ensuring DICOM Part 14 compliance across all reading environments. By moving from reactive manual checks to proactive, sensor-driven monitoring, you protect your patients from misdiagnosis and your facility from regulatory risk. Consistency is the foundation of clinical trust.
Dextro Imaging Solutions is your partner in streamlining these complex operations. As an authorized Jusha distributor, we specialize in teleradiology solutions and comprehensive PACS integration support. We help you eliminate the technical hurdles of remote reading while maintaining hospital-grade precision. It's time to remove the guesswork from your quality assurance program and focus on delivering high-stakes care with absolute confidence.
Upgrade to DICOM-Compliant Jusha Monitors Today and experience the seamlessness of modern diagnostic imaging.
Frequently Asked Questions
How often should a radiology monitor be calibrated?
Radiology monitors should undergo a full calibration at least once a year, though monthly consistency checks are the current professional standard. Hardware backlights naturally dim and shift in color temperature over time, making regular validation essential. Using a radiology monitor calibration guide helps establish a schedule that prevents drift before it impacts clinical interpretation. High-performance units like Jusha Diagnostic Monitors often use built-in sensors to perform these checks automatically, reducing the risk of human error.
Is DICOM compliance required for home reading stations?
Yes, DICOM Part 14 compliance is mandatory for any workstation used for primary diagnostic interpretation, regardless of its location. Teleradiologists must ensure their home environments meet the same luminance and contrast standards as hospital-based reading rooms. Using specialized hardware like Portable Radiology Workstations ensures that your remote setup remains compliant. This consistency protects the integrity of the diagnostic process and ensures that subtle findings aren't lost due to substandard display performance.
Can I use a consumer-grade monitor if it is DICOM calibrated?
You shouldn't rely on consumer-grade monitors for primary diagnosis, even if they claim to support DICOM calibration. These displays typically lack the 10-bit grayscale depth and high maximum luminance required by the ACR. They also don't have the internal stability or specialized sensors found in Jusha Diagnostic Monitors. While software can adjust the output curve, it can't compensate for hardware that lacks the physical ability to render precise medical imaging details consistently over time.
What is the difference between calibration and conformance testing?
Calibration is the active process of adjusting a monitor’s internal settings to match the DICOM GSDF curve. Conformance testing is the secondary validation step that verifies if those adjustments actually meet the required standards. Think of calibration as the "fix" and conformance as the "audit." A successful radiology monitor calibration guide includes both steps to ensure the display passes the 10% deviation rule for Just Noticeable Differences (JNDs) across the entire grayscale.
Do OLED monitors require different calibration than LCDs?
OLED monitors require specialized calibration protocols because their organic pixels age at different rates than traditional LCD backlights. While OLED offers superior black levels, it's susceptible to sub-pixel degradation and "burn-in" that can skew grayscale accuracy. Modern Dextro Reading Stations are designed to handle these specific shifts, ensuring that peak luminance remains stable. Calibration software for OLED must account for these unique characteristics to maintain a perceptually linear display over the device's lifespan.
What happens if my diagnostic monitor fails a DICOM conformance test?
If a monitor fails a conformance test, you must first attempt a full recalibration to adjust the internal Look Up Table (LUT). If the display still fails to meet the 10% JND threshold or the ACR minimum luminance requirements, it's no longer suitable for diagnostic interpretation. Failing hardware often indicates a degraded backlight or a failing panel. In these cases, replacing the unit with a compliant model is the only way to maintain clinical safety and accreditation standards.
Can calibration software fix a monitor with 'dead' pixels?
No, calibration software cannot repair dead or stuck pixels, as these are physical hardware defects. While software can optimize the grayscale curve and luminance distribution, it can't restore functionality to a failed sub-pixel. Most medical-grade display standards have strict tolerances for the number and location of dead pixels allowed before a monitor must be replaced. If hardware damage compromises the central viewing area, it's time to transition to a new diagnostic display to ensure interpretative accuracy.
How does ambient light affect the calibration of my radiology workstation?
Excessive ambient light creates reflections and "washout" that significantly reduce the perceived contrast of your images. If a room is too bright, the monitor's black levels appear higher, making it difficult to see subtle pathology in dark regions. To maintain compliance, reading rooms should be kept between 25 and 50 lux. Proper calibration accounts for this environmental factor, but if the lighting is uncontrolled, even a perfectly calibrated monitor will fail to deliver the necessary diagnostic clarity for safe interpretation.


