

A radiology monitor for home reading is only one part of a diagnostic display chain. Calibration, room lighting, workstation components, and imaging software all affect how consistently images appear and how smoothly you can review them.
Resolution, luminance, and DICOM compatibility are useful starting points, but a specification sheet can’t answer every practical question. Does the display fit your reading tasks? Can its output be calibrated and maintained? Will your home setup support consistent viewing? Requirements also depend on your facility’s policies and the work you perform.
This guide offers a practical framework for evaluating both the display and the conditions around it. You’ll learn what to compare, how calibration and ambient light affect consistency, and what to consider across the workstation and PACS workflow. The goal is to help you assess the complete setup, rather than treating the monitor as a standalone purchase.
Key Takeaways
- Match display requirements to the modalities and diagnostic tasks you actually read, rather than relying on a single specification.
- Evaluate resolution, luminance, and grayscale performance in the context of your viewing software and clinical workflow.
- Compare diagnostic and consumer displays by calibration, quality assurance, and support, not resolution alone.
- Use a step-by-step assessment to review the radiology monitor for home reading alongside the workstation, connections, PACS access, and viewing conditions.
- Explore how Dextro Reading Stations, Jusha Diagnostic Monitors, and PACS options can contribute to a coordinated home-reading setup.
What makes a radiology monitor suitable for home reading?
A diagnostic display is evaluated for a defined clinical imaging task against the requirements that apply to that task. No single specification makes every screen suitable for every kind of reading. Selection depends on intended use, modality, viewing software, workflow, and the protocols set by the relevant institution or jurisdiction. Because Radiology covers different imaging modalities and clinical roles, a display used to interpret one type of study may not be appropriate for another.
A monitor isn’t diagnostically ready on its own: suitability depends on how the display performs within the complete, controlled imaging workflow for its intended clinical use. Keep the reading task at the center of the decision instead of relying on a single headline specification.
Diagnostic interpretation versus general image review
Primary diagnostic interpretation means using images to inform clinical assessment. It can place different demands on grayscale visibility, luminance, calibration, and quality assurance than reference viewing, teaching, administrative work, or reviewing images without making a primary interpretation. These other tasks still benefit from a clear screen, but clarity alone doesn’t establish suitability for diagnostic use.
Don’t dismiss a consumer display categorically, and don’t treat high resolution as proof of clinical suitability. The key question is whether the display and its operating conditions meet the expectations for the particular task. Start with your institution’s policy. It may specify approved display classes, testing procedures, or role-specific requirements. Apply those requirements to the work you’ll perform at home.
Why home conditions change the evaluation
Room conditions affect what you perceive on screen. Ambient light can alter perceived contrast, while reflections from windows, lamps, or bright surfaces can distract from image details. A display that appears consistent in one room may look different as lighting changes during the day. The home environment is part of the evaluation, not just a matter of comfort.
Repeatable viewing conditions help keep the display’s appearance more consistent across reading sessions. Check whether lighting and reflections are stable and whether the screen stays in the same viewing position. These factors work alongside the monitor’s output and calibration; they don’t replace either.
The full display chain includes the monitor, graphics hardware, connection, operating system, image-viewing software, and room. A change in one part can affect how images reach or appear on screen. For example, an appropriate display may still be undermined by inconsistent software configuration or distracting glare. Judge suitability at the system level.
Before comparing screens, define the clinical task and the protocol that governs it. Then assess whether the display, calibration and quality checks, and home viewing conditions support that use. This gives you a practical basis for comparing specifications without assuming that one feature guarantees diagnostic readiness.
Which display characteristics matter for home radiology reading?
Compare display characteristics against the images you interpret and the software you use to view them. Pixel count, screen size, luminance, and grayscale response each affect image presentation, but none establishes suitability on its own. Assess a radiology monitor for home reading in relation to your diagnostic tasks and the requirements that govern them, not by one headline figure.
Resolution, luminance, and grayscale performance
Resolution describes how many pixels form an image; physical screen size affects how those pixels are presented across the viewing area. A higher pixel count may provide more image detail or workspace, but the benefit depends on the source images, viewing software, display scaling, and whether you need to compare images side by side. For example, a reader reviewing cross-sectional studies may value a layout that keeps image detail and comparison views accessible. Other tasks may call for a different balance.
Luminance describes the light output of the display. Its usable range, consistency across the screen, and ability to show darker and brighter details all matter for image review. Grayscale performance concerns how distinctly the display presents shades between black and white. Subtle differences can matter in grayscale imaging, so assess how the screen renders those tones under its intended settings. The ACR Technical Standard for Electronic Display Devices is a useful professional reference when considering display characteristics, including uniformity.
There is no single resolution or brightness value that suits every modality, task, and viewing environment. Treat specifications as indicators of capability, then consider whether the complete display system can deliver the image presentation your workflow requires.
DICOM calibration and display consistency
DICOM Part 14 defines the Grayscale Standard Display Function, or GSDF, a standardized relationship between display input values and luminance steps. Calibration to GSDF aims to make grayscale changes appear more perceptually consistent across the display’s tonal range. It aligns display response with a defined curve; it doesn’t establish that a monitor is appropriate for every clinical task.
Calibration is not the same as ongoing quality assurance. A calibrated display can drift, and calibration alone doesn’t assess every factor that influences diagnostic use, such as resolution, luminance uniformity, viewing conditions, or the image application. The distinction is simple: a specification describes potential; verified performance shows how the display behaves under tested conditions. Follow applicable institutional protocols for calibration and quality checks to ensure consistent performance over time.
Compare display options by task, not numbers alone. Dextro Imaging Solutions' diagnostic display and workstation solutions bring monitor selection into the wider home-reading workflow.
Diagnostic monitor versus consumer display: how to compare home options
A diagnostic display and a consumer display may share features such as high resolution, but they’re typically designed and assessed with different use cases in mind. That doesn’t mean every consumer screen is unsuitable or every medical display fits every task. Compare the complete system against your reading responsibilities and applicable institutional protocols.
Compare the whole display workflow, not one specification
Use these criteria to structure the comparison. Published specifications describe stated capabilities; they don’t, by themselves, verify how the display performs in your workstation and viewing conditions.
Intended use: A diagnostic display is selected and evaluated for a defined clinical imaging task. A consumer display may be designed for general computing or entertainment, though its suitability depends on the task and applicable requirements.
Calibration: Compare whether the display can be calibrated for the required use and how calibration is performed. A stated DICOM mode or capability isn’t the same as verified, maintained performance.
Grayscale: Assess whether subtle grayscale differences are presented appropriately for your imaging tasks. Don’t assume resolution alone indicates grayscale performance.
Quality assurance: Consider how display performance is assessed and monitored over time. A specification sheet cannot substitute for testing under the relevant protocol.
Support: Compare the available documentation and support for the display and its configuration. Consider whether the system can be managed consistently within your workflow.
This is a general comparison framework, not a universal approval checklist. Appropriate requirements depend on your location, institution, clinical responsibilities, and the protocols that apply to your work. Published specifications help narrow the options, but performance verification and local policy determine whether a specific configuration is acceptable for its intended use.
Match the setup to modality and reading responsibilities
Start with the studies you interpret. Grayscale-heavy workflows call for particular attention to luminance response and differentiation between gray levels. Color-dependent imaging tasks raise different considerations, including color presentation. A display’s strengths in one area don’t automatically establish suitability in another.
Specialized work, including mammography or other modality-specific interpretation, may have distinct requirements. Review those responsibilities against current institutional protocols rather than extrapolating from a general display comparison. Also consider whether your role involves primary interpretation or reference viewing, since expectations can differ.
For a wider view of the workstation components that shape the reading experience, consult this radiology reading workstation guide. It can help put display selection in context alongside the rest of the workstation, while keeping the final evaluation focused on your specific tasks and applicable requirements.
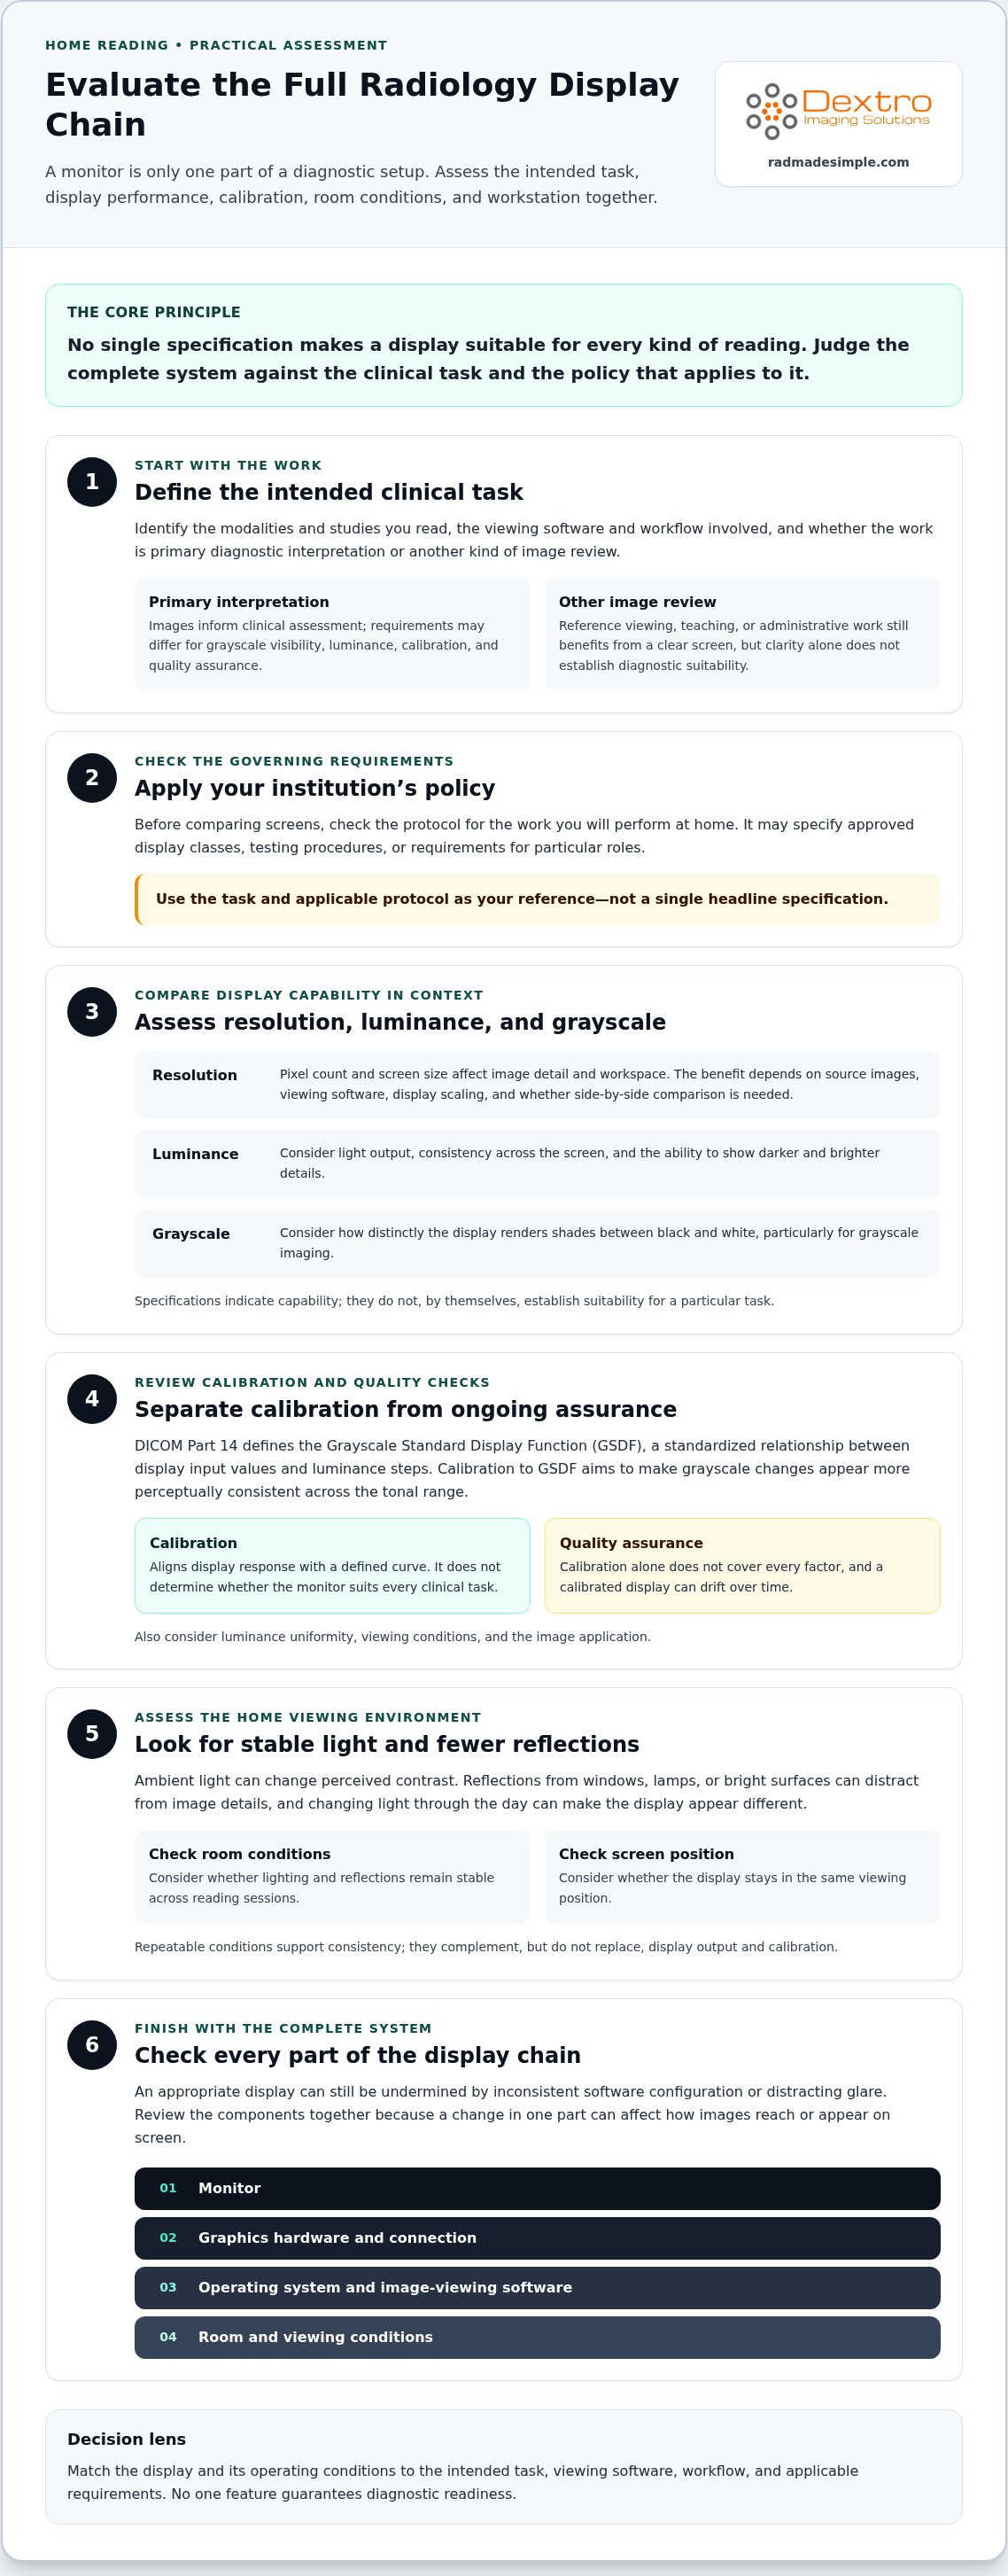
How to evaluate a home radiology monitor setup before deployment
Assess the complete reading environment before putting a radiology monitor for home reading into clinical use. A structured review can reveal gaps that a monitor specification sheet won’t, from unclear role requirements to an unsuitable display connection or inconsistent room lighting. Follow your organization’s policies throughout, especially for remote access, network security, and clinical acceptance.
Start with requirements and the home viewing environment
Define the work first. Record the modalities and study types you’ll read, your responsibilities, expected workload, and the protocols that apply to your role. These requirements give you a practical basis for selecting and assessing the system.
- Document the use case. Identify whether the setup will support primary interpretation, reference review, or more than one task. Capture modality-specific requirements and relevant institutional policies.
- Review the home viewing area. Check ambient lighting, reflections from windows and lamps, screen placement, and whether you can keep conditions reasonably consistent during reading. Note changes in daylight or room use that could affect viewing.
- Map the workstation. List the computer, graphics hardware, operating system, display connections, monitor configuration, and viewing software. Confirm that the arrangement supports the display setup and image presentation your workflow requires.
- Plan PACS and remote access. Include the route to PACS and relevant software dependencies in the assessment. Configure network access and security according to employer and institutional policies. A successful login alone doesn’t show that the full reading setup is ready.
- Test the configured chain. Review the display, workstation, connections, software, and viewing conditions together using your organization’s approved acceptance process. Record the configuration and results, including issues that need resolution before use.
- Set ongoing checks. Follow approved calibration and quality assurance procedures, along with applicable manufacturer guidance. Record checks, configuration changes, maintenance, and the personnel responsible. Use the relevant protocol for timing rather than assuming one interval applies everywhere.
Validate, document, and maintain the display chain
Acceptance is a documented decision, not simply the moment the monitor turns on. Keep a record of the tested setup so later changes, such as a software update, replacement cable, or workstation adjustment, can be assessed in context. If a change affects display behavior or imaging access, follow the organization’s review process before relying on the revised configuration.
Governance reaches beyond the screen itself. The radiology equipment compliance checklist can help frame broader equipment oversight, while local protocols remain the reference for deployment. For a coordinated hardware approach, explore Dextro Reading Stations as part of a home-reading workflow.
How Dextro supports a coordinated home radiology reading setup
A home-reading system works as a connected workflow, not a collection of independent purchases. The display, workstation, imaging software, and PACS access each play a role. Dextro Imaging Solutions offers diagnostic monitors and workstations, PACS options, and related installation, maintenance, and software integration support.
Coordinate displays, workstations, and imaging software
Dextro Reading Stations and Jusha Diagnostic Monitors are hardware options for professionals planning a home setup. Consider them together: the monitor must suit the intended imaging tasks, while the workstation and software must support how images are accessed and reviewed. A product name alone doesn’t establish which configuration fits a specific modality or institutional protocol.
PACS is another part of the plan. PACS Harmony and aycan PACS are options within the imaging workflow, alongside your organization’s access requirements and software environment. Assess workflow and integration needs as part of choosing a configuration.
This coordinated approach keeps purchase decisions focused. Instead of choosing a radiology monitor for home reading in isolation, outline the full chain: display, workstation, viewing software, PACS access, and the conditions in which you’ll work. That makes it easier to identify dependencies and plan around actual requirements.
Plan the next step around the reading workflow
Before planning equipment, assemble a concise requirements brief. Include:
- Reading responsibilities: the modalities and study types involved, and whether the work is primary interpretation or another form of review.
- Display needs: the characteristics required for those tasks, along with the relevant calibration and quality assurance procedures.
- Home conditions: lighting, reflections, screen placement, and how you’ll keep viewing conditions consistent.
- Workflow dependencies: workstation components, display connections, viewing software, PACS access, and applicable security policies.
With these priorities documented, include Dextro Imaging Solutions' installation, maintenance, and software integration support in your equipment and workflow plan. Connecting these needs helps clarify what must be configured, maintained, and reviewed across the system. Institutional requirements remain central to final selection and deployment.
Ready to plan a coordinated home-reading workflow? Explore Dextro Imaging Solutions and discuss your workflow needs.
Turn your display requirements into a confident next step
Turn your evaluation into a decision you can revisit. Record why the selected radiology monitor for home reading fits your responsibilities, which requirements guided the choice, and who owns review when your workflow or equipment changes. A clear record helps make future adjustments deliberate instead of turning each change into a fresh guessing game.
That planning connects technical decisions with operational ones. Dextro brings diagnostic radiology monitors and specialized workstations together with PACS solutions, software integration, installation, maintenance, and technical support. This gives you a coordinated way to consider the display alongside the systems and support that shape the reading workflow.
Move forward with your priorities in hand: intended use, institutional requirements, workflow dependencies, and ongoing oversight. Explore Dextro imaging solutions to consider options for your home-reading setup and discuss your workflow needs.
A well-planned setup starts with clear requirements and a practical process for maintaining them. Take the next step with confidence.
Frequently Asked Questions
Can radiology images be read over Wi-Fi from home?
Yes, remote image access over Wi-Fi may be possible if it’s approved within your organization’s network and security policies. A fast connection alone doesn’t authorize access or establish that image transfer and display will perform reliably for your workflow. Interruptions or delays during image loading, for example, may affect how you work through a study. Follow your institution’s remote-access procedures and consult its IT and security teams about the approved setup.
How often should a home diagnostic monitor be calibrated?
There’s no single calibration interval that applies to every home diagnostic monitor. The schedule depends on the display, its intended use, manufacturer guidance, and your institution’s quality assurance procedures. Follow the established process and retain the calibration record, including the date and outcome. If the display’s appearance changes, or it has been moved or reconfigured, report the change and follow your organization’s review procedure rather than assuming the existing calibration remains adequate.
What quality assurance records should a home radiologist keep?
Keep the records your organization requires, which may include the monitor identity, workstation and display configuration, calibration dates, quality check results, and corrective actions. Note relevant changes, such as replacing a display connection or updating viewing software, so the record reflects the setup actually in use. These documents support consistent oversight and help trace issues, but documentation alone doesn’t prove that a system is suitable for a particular diagnostic task.
Can any PACS work with a home radiology monitor?
No. PACS access depends on the software environment, workstation configuration, connectivity, security controls, and how the organization has set up access. A monitor displays images but doesn’t provide PACS access by itself. A screen may work correctly while a workstation lacks the approved software or access route. Assess the entire workflow and use your organization’s approved integration and remote-access procedures; don’t assume compatibility across systems.
Does a diagnostic monitor need to be used in a dark room?
Not necessarily. The goal is controlled, consistent viewing conditions, not automatic total darkness for every home setup. Ambient light can affect perceived contrast, and reflections from windows or lamps may obscure details. A room that changes from bright daylight to dim evening light can also make viewing less consistent. Follow the display manufacturer’s guidance and your organization’s protocol for the intended reading task when arranging the room.
Can one home radiology monitor be used for every imaging modality?
Not automatically. Whether one display can serve multiple modalities depends on the images, your diagnostic responsibilities, display characteristics, and applicable institutional requirements. A workflow centered on grayscale images may have different display considerations from color-dependent imaging. Specialized interpretation tasks may also involve specific protocols. Before deployment, list the modalities you’ll read and assess the display against each task and your organization’s requirements, rather than assuming one configuration suits every use.


